Find - Searching and Browsing
Quick Search
Always available in the upper right-hand corner of the browser window, the QuickSearch is the simplest and most convenient search tool in CollectiveAccess. It will cast a wide net for terms entered into it, searching across all fields in all tables of records.
Basic Search
At its simplest the basic search is a full text search (Fig. 3.1) across all fields within the table you’re searching in (e.g. Find > Objects searches for Object records, Find > Entities searches for Entity records). Simply type in a word or phrase and click on the “search” button to receive matching results.
A search syntax may be used to create more precise basic searches that include boolean combinations, wildcard searches, searching on creation and modification dates and more. See the manual entry for Search Syntax for examples.

Fig 3.1: Basic search bar
Advanced Search
The Advanced Search allows users to define custom search forms, consisting of specific fields. While the basic search, by default, looks across all fields, the advanced search always searches within specific fields and generates highly targeted results.

Fig 3.2: Example of an advanced search form
Advanced search forms are created through Manage > My search tools > Search forms. See the manual entry for Advanced Search Forms for instructions.
Search Syntax
Searching for blank values: As of version 1.4, the Advanced Search can find records with no content in a specific field. The following syntax will return all records with no value for a field: [BLANK].
Wildcards:
The asterisk (“*”) is used as a wildcard character. It matches any text if used on its own and can be used in the Quick and Basic searches to find all records. Wildcards may also be used at the end of a word, to match words that start your search term. For example: wri*.
Searching on creation and modification dates: In Quick Search and Basic Search, you can search on the creation and modification dates of records using the special created and modified access points together with a valid date/time expression. For example, to find everything created on April 12, 2012 you can search using:created:"4/12/2012". To find everything modified on April 12, 2012 you can search using:modified:"4/12/2012".
You can limit the returned items to those created or modified by a specific user by adding a valid user name after the access point. For example, to find things modified by user “catherine” in April 2012 you can search using: modified.catherine:"4/2012".
Browse
The Browse allows you to generate and refine results by filtering on specific attributes of data. For example, by browsing for Objects by Entity, you can retrieve every object that is created by a particular Individual or Organization. You can further refine these results by selecting additional attributes. For example, by selecting Decades you can choose to retrieve only records made in the 1970s.
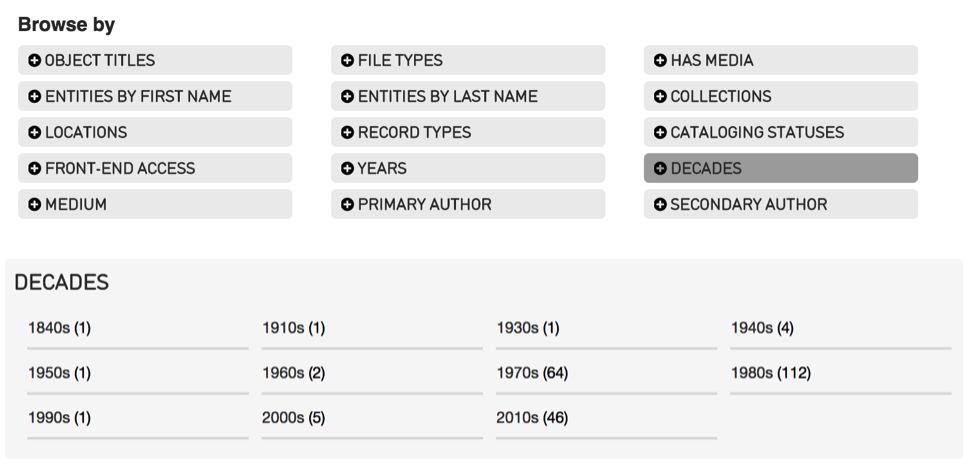
Fig 3.3: Browse menu for Objects
Working with Search Results
Once you have generated results using any of the available search tools, there are several options available to control how the data is displayed, refined, edited and exported.
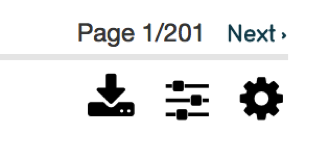
Fig 3.4: Search result tools: Export tools, Refine results, Display Options (respectively)
Display Options
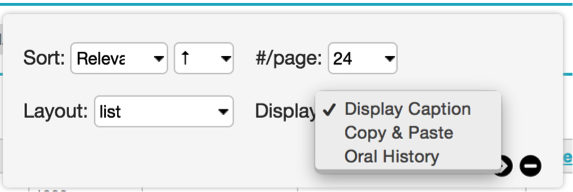
Fig 3.5: Display Options
Click on the display options icon to view all settings to control how search results are displayed.
Sort: choose how results are sorted. You can sort on relevance, title, idno, or any number of other data attributes.
Ascending/Descending: specifies the direction to sort, either ascending or descending order.
#/page: the maximum number of results to be shown per page (12, 24, 36, 48)
Layout: three layout options for search results are available for Objects (a subset of these options are available for other types of records). Thumbnails displays image thumbnails, along with title and idno. The List layout shows results in a tabled format, similar to a spreadsheet. The metadata that is shown is controlled by Displays, explained in detail below. Finally, Full mode shows the primary object image as well as all metadata from the chosen Display, but in a vertical form, rather than a tabled spreadsheet.

Fig 3.6: Full display
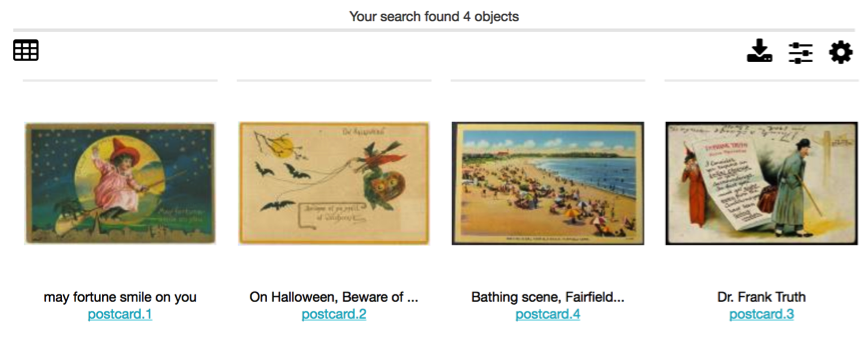
Fig 3.7: Thumbnail display
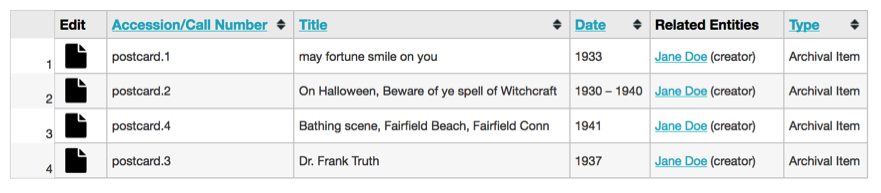
Fig 3.8: List display
Display: choose which metadata Display to use to view your search results. For details on creating custom displays, see the manual entry for Displays.
Export Tools
Export tools allow you to export the results of a search or browse – with any configured Display – to a variety of formats, including tab and comma delimited, Microsoft Word and Excel, or PDF.
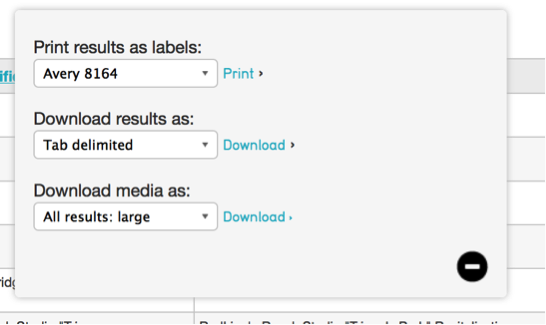
Fig 3.9: Export tools
Refine Results
Refine controls enable filtering of search results using the same controls used for browsing. It is essentially no different from the Browse, except that you can run a full text search first and then use the browse facets to further refine the results of the full text search.
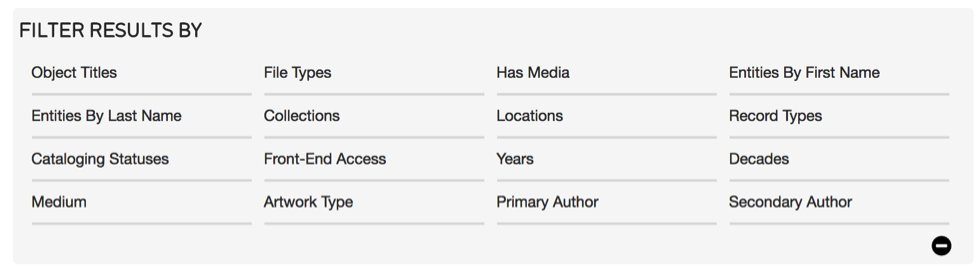
Fig 3.10: Refine results
Edit in Spreadsheet
Spreadsheet mode looks similar to the List mode, but allows you to apply edits directly to most fields in the listed records without leaving the search results screen.

Fig 3.11: Edit in spreadsheet button
Set Tools
Sets are ordered, ad-hoc groupings of a single type of record defined by users for a practical purpose (e.g., a working checklist for an upcoming exhibition, a selection of records to publish on a website, or a set of records that need editing). Sets are temporary groupings meant to facilitate cataloguing workflows including batch editing and for reporting. The placement of records within a set does not replace cataloguing. Catalogue by entering values in metadata fields for long-term documentation. Sets should be carefully maintained because they can quickly clutter the sets module. Be sure to delete sets after batch editing.
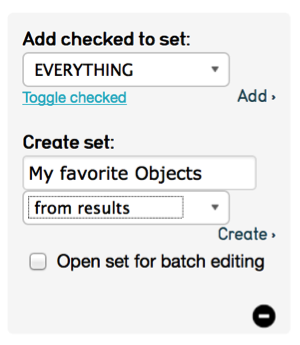
Fig 3.12: Set Tools You can create Sets directly from results using Set Tools.
Create Set: Click on Set Tools in results to expand the Set Tools options. Name the Set in the Create Set box and make a selection for a) the entire search results or b) only those checked.
Open Set for batch editing: Opens the set in the Batch Editor for applying global edits. For information on batch editing see the manual entry for Batch Edit.
Add checked to Set: Allows addition of records to pre-existing Sets, by checking records and selecting “Add checked to Set.” Check the top-most checkbox to check all records on the current page.
Find records in Set: Once at least one set has been created, you can find records in a set by selecting the set from the “Search by Set” menu in the upper left corner of Basic Search and clicking the arrow.
Manage Sets: Go to Manage> My Sets> User Sets to review, edit, add and delete all sets. See the manual entry for My Sets.
Saved Searches
Searches can be saved by clicking the “Save Search” link in Basic Search forms (upper right corner) or using the “Save search as” (bottom right corner of form) within Advanced Search forms.
Perform Saved Search: Perform a saved search by selecting the search from the “Saved Searches” menu in the upper left corner of the Basic and Advanced Search and clicking the arrow.
Manage Saved Searches: You can view, delete and perform all your saved searches in Manage > My Search Tools > Saved Searches.
Visualization
Provides visualization options for data when configured for your system. Options include maps to visualize records with georeference coordinates and timelines based upon entered dates.
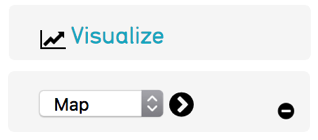
Fig 3.13: Visualization Tools
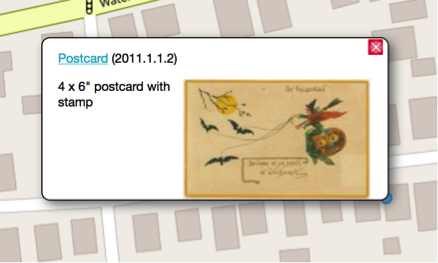
Map

Timeline
Fig 3.14: Visualizations